photo BlogButton_zpsf979d556.jpg  photo AboutMeButton_zps0d48ecc3.jpg  photo FinishesButton_zps92f1f16c.jpg  photo TutorialsButton_zps33a38379.jpg  photo RTQLabel_zps71a4ad0f.jpg

30 April 2014

Zipper Pillow: WiP Wednesday

One of my friends is having a birthday. In June. Or July. So, not anytime soon. I know she will turn another year older this summer though! We trade crafty things from time to time. I made her a paper pieced potholder last year. She commissioned a pillow from me one time, and gave me a small plate she made in her ceramics class. So, I figured I'd make her something for her birthday this year too.

Older project. Need to make one for myself...
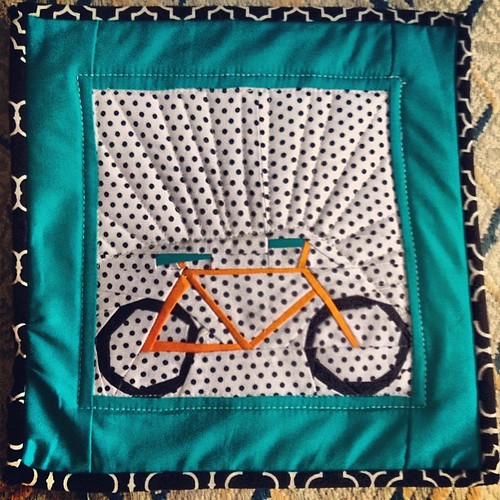
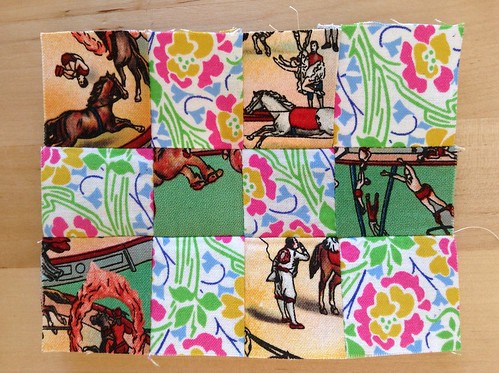
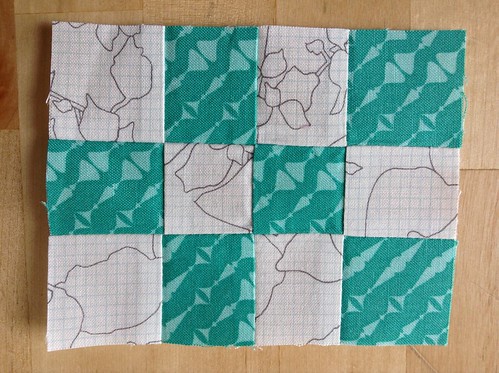
One of my first attempts at paper piecing!
Pattern from Sewhooked. Bike is 6" square. 

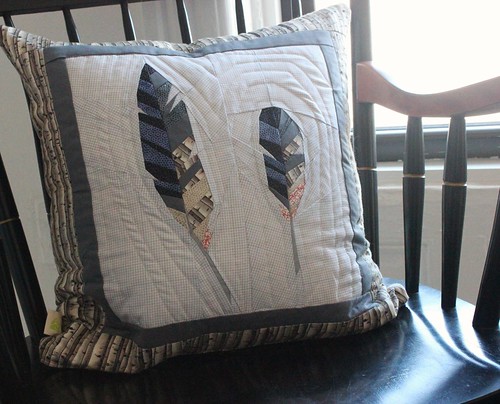
I saw this paper pieced zipper a while ago on Sewing Under the Rainbow. My friend's last name is Zipper, so I thought, 'how appropriate'. I chose some bold colors, and used the black and white stripe to mimic zipper teeth. I'm fairly pleased with how it all came out. Not entirely convinced the scissors were the right choice, but I think I was influenced by the original design. They kind of make me think of a swarm of scissors attacking the zipper.

Destined to become a pillow for a friend whose last name is Zipper! Pattern from Sewing Under the Rainbow.
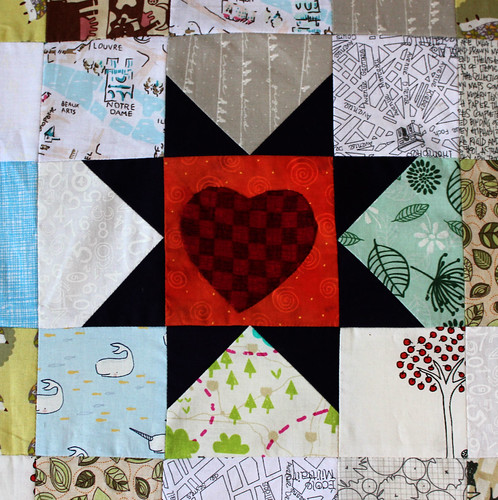
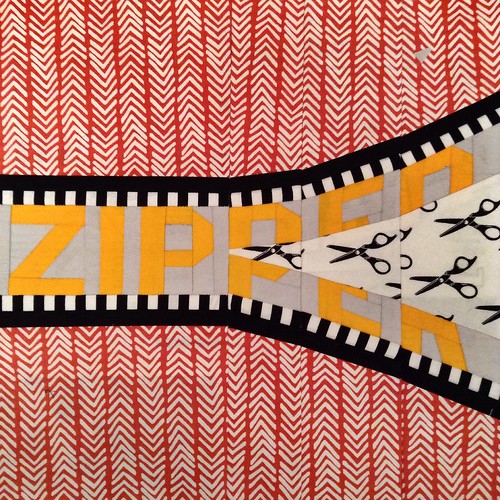
A zipper pillow for Zipper. 12" square. 

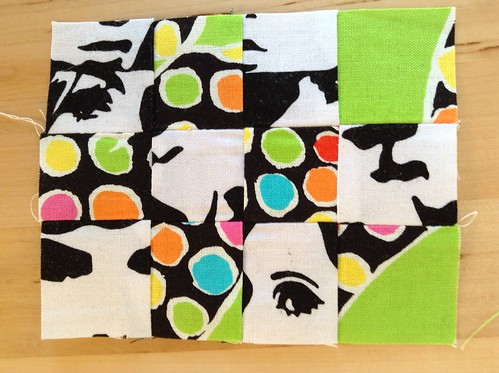
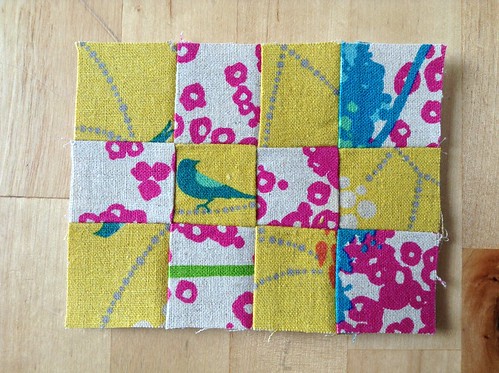
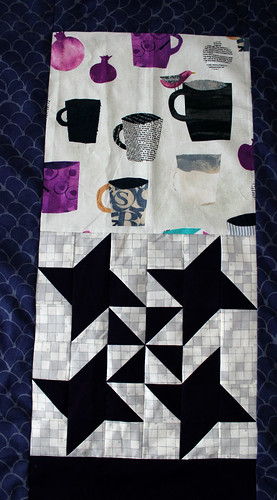
Since she loves music also (as does her boyfriend, who lives with her and will hopefully also be using this pillow), I figured I'll throw this cassette on the back somewhere. The pattern is also from Sewing Under the Rainbow, I saw it as I was scrolling through her tutorials. The band and album name were pulled together from a newspaper print. I was going to come up with a funny and witty name and hand stamp them, but liked the added creativity that came from utilizing my limited stash. Also, I couldn't come up with anything funny OR witty.

Paper Pieced Cassette
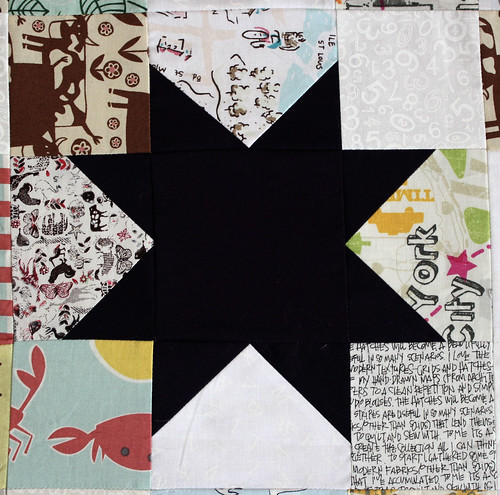
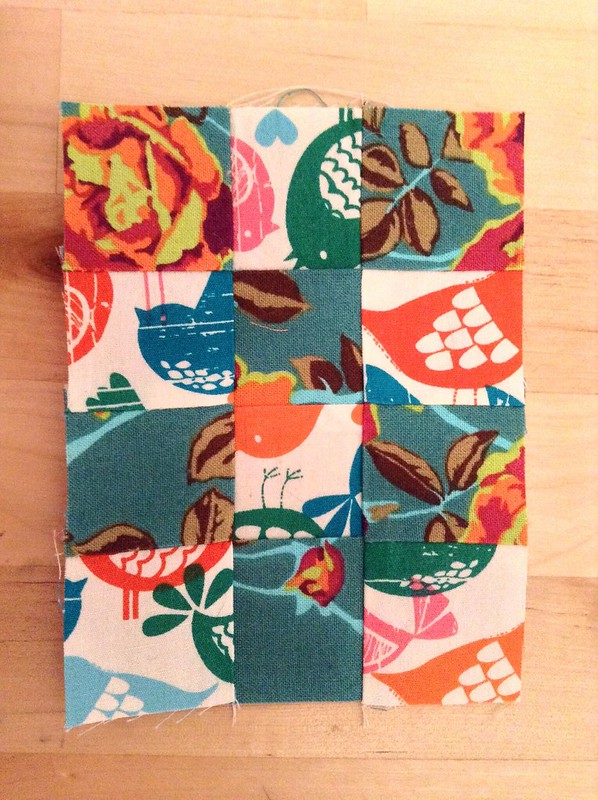
Collins and Cleaves #1 hit album: Skyrocket Society No. 147. Currently 6" by 9".

Next I've got to get each side up to size. They'll probably finish at 18" or 18.5" square, which is perfect for a 20" pillow form (I like it nice and fluffy). They're also going to be quilted...somehow...haven't decided on that yet, but since Friend's birthday isn't for several months, I've got time.

I just want to say: gotta love free patterns! Thank you so much to everyone who provides them! If I ever get good enough I'll be sure to add to the internet library. Someday...

Linking up to WiP Wednesday at Freshly Pieced!

28 April 2014

Birthdate crisis!

This weeks prompt for the Pack Patch Mini QAL by 1/4 inch mark was 'I was born in ____' and 'I wish I was born in____'.

Well, I was born in 1982. Eons ago, if you ask me, but I may be a spring chicken compared to some of you. When I thought of the 80s, I thought: Neon, Spirograph, Velcro sneakers, Walkman, Meatloaf...stuff like that. I remembered some fabric that had a bunch of neon accents (it actually has a french vibe though, there's a repeating man on a bike with a beret and a baguette...somehow it all works), and a graphic pop art black and white fabric I had. I know pop art had it's heyday in the 60s, but I think there was a decent resurgence in the 80s, especially with all the video effects that were being used in music videos.

I was born in 1982...
I was born in 1982...not the 1960s!
When it's all put together I think it gets a kind of 60s vibe...I think the pop art print overwhelmed it. I can live with it though...I'll blame it on my parents using The Beatles, The Rollingstones, and Peter, Paul, and Mary as our childhood soundtrack instead of something more age appropriate. It's given me a birthdate crisis!

I decided I wished I was born in the 1930s. But you know what? I just like how the 30s are romanticized in books and movies. Except the more I think about it, they aren't really. There was the depression, the dust bowl, prohibition. There goes money, food, and drinks! I mean, if I could somehow avoid the repercussions of the depression, yet still have a fun, bawdy, entertainment filled life, I'd have loved the 30s. Fashion, art, entertainment - all beautiful.

I wish I was born in the 1930s...circus fabric from the Shelburn Museum, and art nouveau fabric from the Liberty Stile collection. For more info read my blog entry:
I wish I was born in the 1930s. 
I used a circus print fabric I got at the Shelburn Museum, to depict one of the popular subcultures of the time, and a Liberty Print from the Stile collection to depict for an art nouveau vibe, a popular art genre of the time (and one of my favorite art genres of all time! Even influences one of my tattoos). 

25 April 2014

Flag Plus Block

I'm in the Stash Bee, and May is my month as Queen Bee. I've been thinking for a while now about what block to have the group work on. It's hard to find something that I think people will like to make. The right balance of structure, improv, and color guidelines without being too demanding is difficult to reach! Not sure if I've accomplished it here, but since I finished making the tutorial I thought I'd share a version of it here.

Flag Plus Block

I took a plus block and decided to change the proportions slightly, making it rectangular. Now in my head it looks like flag with a plus on it, hence the 'Flag Plus' name for my block.

This is what I'm aiming for when I get all the blocks from my hive:

Yes, I do all my sketching on graph paper with ball point pens. 

I think I'll make smaller pluses for the blank rectangles on the sides. Not sure yet though, I'll see what happens when I receive blocks from my bee mates.

This is what each of the larger blocks will look like. My color scheme is black and white/lowish volume background with bright jewel color pluses.

Flag Plus Block

Here goes the tutorial!

~Cutting guide~

Background (I chose scrappy, low volume b&w fabrics):
[4] 5.75" by 7.5" rectangles
[2] 2" by 2.5" rectangles
[2] 2" by 3.5" rectangles

Plus color (I chose a yellow floral that I'm really into right now):
[1] 2" by 8.5" rectangle
[2] 2" by 4.5" rectangle

Cutting guide. 

First we'll sew together each side section of the Plus. You'll take the two 4.5" plus color rectangles and the two 3.5" background rectangles and sew one of each together along the short side. You should end up with two segments like this: 

Plus sides. Each is one 3.5" background rectangle and one 4.5" plus rectangle. 

Next we'll sew each side of the block together. You want to sew one of the side sections of the plus you just made between two of the large background rectangles along the long sides. Sew one large background rectangle to the top of the side section, and one to the bottom and you'll end up with two larger segments that each look similar to this: 

You will end up with two of these side sections. 

Next you'll sew the middle portion of the block. It's also the middle section of the 'plus'. Take the 8.5" Plus rectangle and sew a 2.5" background rectangle to each of the short sides. Yours should look something like this:

8.5" plus rectangle with both 2.5" background rectangles sewn to it. 

Finally we'll sew these three sections together to make the block! I've laid out each section the way I'm going to sew them together: When you're laying them out, just make sure that each side segment is rotated so that the plus section is butted up next to that middle plus section, as depicted below.  

Final block layout. 

First sew the left side to the middle, then the right side to the middle. Press your seams towards the center, or open, whichever you prefer. Now you should have a completed Flag Plus block measuring 16" by 12.5"!

Final block, once again. 


I also made a second block that ended up being a little scrappier. Same principal, I just pieced one of the larger background rectangles. 

Another slightly scrappier Flag Plus block!

Hope you enjoyed the tutorial, and I'll be sure to share the finished quilt once I get all the blocks and all the details figured out! If you have any questions or comments feel free to let me know!

Linking up to Finish it up Friday at Crazy Mom Quilts.

23 April 2014

Liberty Trip Layout Help!

I've finished all the blocks for my Liberty Trip quilt! This has got to be the fastest a quilt has ever come together for me! Usually it takes me months and months, and here I've got all the blocks ready to go in a week and a half! This quilt is made with a bunch of FQs from Liberty's Bloomsbury and Stile collections, which gave me just enough strips for 25 blocks.

I ended up piecing the batting from scraps and then I pinned it up on my wall, and now it's my design wall! Pretty McGuyver of me, if I do say so myself. I've arranged my blocks into several layouts and taken pictures so I can try to figure out which one I like the most. If you want to weigh in your opinions are more than welcome!

Layout 1:

Working on the Liberty Trip layout.
Off-center barn raising layout. 

Layout 2:

Working on the Liberty Trip layout.
Zig zags. 

Layout 3:

Working on the Liberty Trip layout.
Sort of like granny squares, or maybe just a scaled square layout. 
Any suggestions for other layouts are welcome too. As you can see, I'm still working on it:

Working on the Liberty Trip layout.
 'Pensive face'. This is what it's like quilting in a Brooklyn apartment.
Linking up to Freshly Pieced WiP Wednesday


22 April 2014

April Showers Bring May Flowers

A fitting post for Earth Day, I'll update the progress of my Pack Patch Mini QAL blocks, hosted by Chase of 1/4" Mark. The themes this week are 'April Showers' and 'Brings May Flowers'. There's a whole bunch of nature inspiration here.

April showers
April Showers
The teal print reminds me of driving rain, except prettier (wasn't feeling an oppressive grey here), and the botanics print with the graph paper and floral outline makes me thing of the promise of flowers to come.

May flowers
Brings May Flowers
The brighter colors on these linen/cotton blends add bit of dimension to this block. The spattering of flowers makes me think of the first blooms of spring. Birds are returning, the sun is shining, we're coming out of hibernation.  

21 April 2014

Otis the Pillow

A while back I made my old roommate a pillow for her birthday. We're in the same PhD program, and I know she loves outdoors, wilderness, wildlife, etc. I figured I'd use this free pattern from Shapemoth that I'd tried as my first paper piecing project (I like to jump in with both feet...).

Otis Cushion
Otis!
For the back of the pillow I used the Shapemoth Feather Block from her Forest QAL. It is still one of my favorite blocks!

Feather cushion
Back? Or other front?
Ex roomie loved the pillow, and gave it a place of high value on her couch. In other news, she's preggo with her first baby, and I'm going to gift a quilt. Theme of the nursery: estuary...

17 April 2014

Quilt for Panda

Lucky Stars
Quilt in the wild! 

This was the first quilt I completed for our household. I decided to make it for the boyfriend, and allowed him to choose most everything. He picked the star pattern, I decided to make it scrappy. He chose the purple solid, I picked a whole stack of low(ish) volumes for backgrounds and he whittled it down.

Lucky Stars!
Back of quilt in the wild!
He picked the backing and made some suggestions on shapes he liked (Pinwheels and Ninja Stars - as we call them).

Back panel detail I
Detail of back. He loved this Collage Print so I added that in. 
A close up of a couple blocks:

I made an applique block in my hand quilting class and never knew what to do with it. I don't particularly like the background orange, but as The Boyfriend had picked it out, I figured the best place for it was in his quilt!

Modified Sawtooth Star II
Love the Narwhals!
This block represents the main block in the quilt. Simple sawtooth stars, with flying geese and squares. I modified the flying geese specifically, making them a little 'short' so that I wouldn't have to worry about the star points meeting (just changed the ratio of the rectangles and squares slightly to make it work for me). As a novice quilter/perfectionist I hate losing my points, though it can't always be helped.

Modified Sawtooth Star I
I swear, the solid is dark purple!
The blocks are all 10 inches finished, and there's no sashing between them. I machine quilted it in straight lines about one inch apart. It finishes just under 80" square, because at the time I didn't care about a proper quarter-inch seam, so mine were a bit generous. Plus, of course, shrinking after washing. 

So, that was my first quilt for our household, and it lives happily on our bed. Until the sweltering NYC summer heat kicks in, of course. 

16 April 2014

Liberty Trip - WiP Wednesday


The first fabric bundle I bought (after that hand quilting class) was a Liberty bundle from the Bloomsbury Collection. I liked the colors and most of the florals, and had no idea what a 'good' price for fabric was (it was a good price, I just didn't know Liberty tends to run a little more expensive than typical quilting cottons). Of course I had no project in mind, and then they found their way into the stash bin, never to be seen nor heard from again (much like every fabric bought without a purpose).

Two years later (ahem) and a few weeks ago it was my birthday, so I made sure to walk by my LQS on the way home, and lo and behold, their Liberty selection was lookin' mighty fine! And their prices were right! And it was my birthday! But I decided to pass. Did I WANT the fabric or did I NEED the fabric? I wanted it.Of course, the second I got home I realized the perfect project: TRIP AROUND THE WORLD IN LIBERTY FABRICS, and suddenly I 'NEEDED' the fabric!

Liberty Trip
10 Blocks Completed!

So, later that week I went back and got two fat quarter bundles (I did the math, you get more strips than with a skinny quarter, plus a little left over). Now I've got enough strips for 25 blocks cut out, and am in the process of sewing up the strip sets and making the blocks. Not sure how the final arrangement will look, but here's some of the blocks I've got so far. Best of all I've reduced my stash by 10 fat quarters...after purchasing an additional 10...hmm.


Liberty Trip
Playing around with my blocks. Can't wait to see how it progresses!

Linking up with Lee at Freshly Pieced for WiP Wednesday.

15 April 2014

Scant Quarter by Scant Quarter


I've realized that I need to work harder on my piecing accuracy. Initially I just quilted for myself, and figured, "hey, no quilting police, no need to force those scant quarter inches(!)". I figured if I was making all the blocks for a quilt and they were all off by the same amount who cares, it'll still fit together. This philosophy got me through my first two machine pieced quilts and several other projects. 

Now I'm in the Stash Bee, however, and to avoid shaming myself I have to ensure that my blocks are up to snuff! That means accurate seam allowances (among other things)! YIKES!

So, I joined in with 1/4" Mark's Pack Patch Mini QAL. It's pretty interesting. Besides practicing my accuracy Chase, who writes the blog, gives two prompts each week. This week were True Colors and Favorite Colors. 
True Colors
True Colors
I think the black and white in my true colors block represents me because I'm pragmatic and bold, just like black and white. The prints also speak to me, with the polka dots representing my whimsical side and the topography showing off my interest in the environment (it's what I study in PhD life). 
My Favorite Colors
Favorite Colors
I chose the Hand Drawn Garden fabric because it is one of my absolute favorites so I knew I had to use it. I'm also using it on the back of one of my WiPs in both colorways. I'm often drawn to bold, primary colors, and I think the bird print helps show that. 

Testing

<a href="http://www.bloglovin.com/blog/12122407/?claim=ackfc9gx58t">Follow my blog with Bloglovin</a>